

TinyTV® DIY Kit
ASK4002
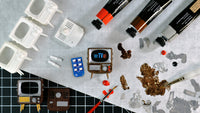
The TinyTV® DIY Kit is a mini that assembles easily in less than 5 minutes with no soldering or special tools required. Load your own videos, movies, and TV shows easily using our TSVconverter - a free tool to convert any MP4 file. Then load the files onto the included MicroSD card. Add it to your collection of dollhouse furniture, miniature models, and dioramas.
Note: This does not receive over-the-air television content, nor can it livestream, it can only play video content from the microSD card.
The TinyTV DIY Kit is 3D printed, has a rechargeable battery, 4 push-buttons, and an ON/OFF switch and it also comes with the Tiny Remote, so you can easily change channels, power on or off, and adjust the volume. The TinyTV comes in white but is highly customizable with acrylic paint or even metallic sharpies. Check out our Customizing your DIY TinyTV Kit tutorial!
Want to change up some settings? The TinyTV also comes with a settings menu to easily change the TV mode to loop videos, or change button values if you want to use a different remote. Check out the short TinyTV Settings Menu tutorial!
This miniature best fits a 1:12 scale for a working TV, but please view the Tech Specs for the measurements to make your own decision on sizing.
Please view the F.A.Q. tab on this page for frequently asked questions.
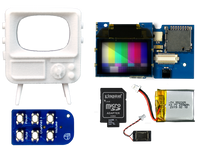
This kit includes the following items:
- TinyScreen+ Processor Board - Runs the TinyTV program, has a SAMD 32-bit processor, OLED screen, USB, and power/battery-charging circuitry.
- MicroSD / Audio TInyShield - Designed specifically for use with the TinyScreen+, this TinyShield has the microSD card adapter, audio driver, and IR receiver (which can receive TV remote control signals).
- TinyTV 3D-Printed Enclosure - grab an extra for a different paint job, or print your own (3D files found under DOWNLOADS).
- Tiny IR Remote (includes battery) - Features 6 buttons to alter the channel, volume, and power state. The TinyTV can be reprogrammed to be used with different IR remotes or different buttons using the TinyTV Settings Menu.
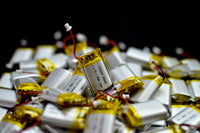
- 290 mAh Rechargeable Lithium Polymer Battery - Used to power your TinyTV, and is recharged when the USB is plugged into the top of the TinyTV. Charging is complete when the amber LED next to the USB port turns off. A fully charged battery can display videos for up to 5 hours.
- 16x9 Speaker - for audio playback on videos
- 8GB MicroSD card and Adapter - preloaded with sample videos.
- Arduino-compatible platform with a powerful 32-bit ARM processor
- A beautiful and vibrant full-color OLED screen
- MicroSD card included and preloaded with content
- 3D Printed TV with 4 push buttons and ON/OFF switch
- Built-in speaker
- Rechargeable lithium battery
- USB port for charging and software updates
- Wireless Tiny Remote with battery - Works best about 12-18in. away from an IR Receiver. Works best with the TinyTV when pointed toward the top (where the receiver is).
Measurements (when looking at the screen):
- Max height: 42mm ± 1mm
- Max length: 35.7mm ± 1mm
- Max width: 25.5mm ± 1mm
- Converting videos to the TinyScreen video format (tsv) is simple, just run them through the TSV video converter and put them onto the microSD card to play them back.
- A micro USB cable is not included in the kit.
- The Tiny Remote works best about 12-18in. away from an IR Receiver. Works best with the TinyTV when pointed toward the top (where the receiver is).
The TinyTV DIY Kit is simple to put together - there is no glue, soldering, or special tools needed. It only takes about 5 minutes before you can sit back, relax, and enjoy your favorite movies, videos, and TV shows from anywhere.
- Step by step assembly instructions are available here, or you can watch the assembly video:
- TinyTV Enclosure 3D STL files
- Printed out of SLS Nylon with a raw finish using the 3D printing service JawsTec
- TinyTV Arduino Firmware
- TinyTV Sample Videos (.TSV Format)
If one of the below options doesn't answer your question(s), you can post on the TinyTV section of our forum, or get in touch with customer support.
Can I buy just the electronics inside the TV?
- Yes! You can buy just the electronics inside the TinyTV by purchasing the Tiny Video Player Kit. This kit does not include the Tiny Remote.
I want to create my own TV case - what resources do you have available?
-
There is a hardware diagram in the photo reel of the Tiny Video Player Kit that displays the measurements of the assembled hardware that goes inside the TinyTV enclosure (including the TinyScreen+, MicroSD & Audio TinyShield, battery, and speaker).
-
The STL files of the TinyTV enclosure are available from the TinyTV product page under DOWNLOADS. Additionally, there is a hardware diagram of the TV enclosure at the end of the TinyTV product page photo reel.
-
The TV enclosures we distribute are printed using SLS Nylon with a raw finish by the 3D printing service JawsTec. We use professional grade printers due to the small size and level of detail put into the TinyTV enclosure, so please keep this in mind while using different 3D printers.
My screen is not working, how can I check if it has been damaged?
- If no display is showing, it's possible that the screen could have been damaged during shipment or assembly. Or it could be that the converted videos are somehow corrupt. To check that the screen is working - can you try putting the TinyScreen+ board into bootloader mode? When correctly done, the screen will display "TinyScreen+ Bootloader Mode" on the screen.
- For bootloader mode, turn off the TV device (switch should be down), and then hold in the top-left button closest to the micro USB port while turning the unit back on. The most important part is keeping the button held in. Make sure the battery is charged and try this a few times to see if you can get anything to appear on the screen.
How do I charge the TinyTV?
- To charge the TV you will need a Micro USB B cable. Once you have the cable, you just need to plug it into the TV and a power source. You will know it is charging by the amber/yellow LED that turns on. The LED will turn off once it's fully charged.
Is there a way to "loop" or "auto-play" the videos when the TV is turned on? Can I change the remote codes to use a different remote?
- Yes! These features are easily edited by using the Settings Menu.
What is the best paint to use when painting the TinyTV enclosure?
- We covered a few different options, including using Sharpies, in our Painting and Customization tutorial. Check it out!
I turn the TV on and get the message "Card not found!"
- Make sure the SD Card is fully inserted. Then double-check that the SD & Audio TinyShield is fully joined to the TinyScreen+ board inside the TV - It may help to take the SD & Audio TinyShield completely out of the TV enclosure to try and reseat it.
My new SD Card is not working with the TV.
- Try reformatting the SD Card to FAT32 using an SD Card Formatting Utility. Make sure any important files on the SD Card are moved before starting this process - all files will be deleted during formatting.
The remote is not working.
- The remote works best when pointing it directly at the top of the TinyTV enclosure, as this is where the receiver is within the TV.
- The remote will work around 12-16 inches away from the TV - this can change depending on the thickness of the TV enclosure and the amount of paint layered on the TV.
- Make sure the battery is fully seated in the battery holder. You can check that the remote is working by pressing one of the six white buttons while looking at the bottom of the remote. A red LED on the bottom of the board will flicker when a button is pressed.
- You can test that the IR Receiver inside the TV is working by using any other IR Remote with the IR settings menu on the TinyTV (to get to the settings menu, turn the TV off with the power switch and while holding the top right TV button, turn the TV back on). Check out the full settings tutorial for more information.
How can I make the TV louder?
- You should be able to get around 2-5x the sound by pressing and installing the speaker more firmly. To do this, take off the white sticker and adhere the speaker firmly against a flat surface (like on the inside of the TV's back panel). It may help to have the TinyTV on with a video playing and testing the audio while pressing on the speaker.
- The volume on the TV is limited by the volume of the video that is converted using the TSV Converter. Make sure that you are converting videos with louder volume, or consider editing the volume on a video with a utility like Photoshop.
Why are some of my videos are not playing on the TinyTV?
-
If the title of the video is too long, the videos will not display. Try keeping the titles of the videos shorter than 50 characters. "For example - this sentence is 50 characters long!"
- It's not common, but it is possible that the .mp4 video or .tsv converted video file is corrupted. Please make sure the video is playable on your computer before converting it, and then be sure to safely eject the SD Card from your computer to avoid any file corruption issues.


