TinyScreen/TinyScreen+ Menu Scroll
This tutorial highlights an Arduino sketch that expands the possibilities of what can be written and displayed on the display TinyScreen TinyShield or the TinyScreen+ by using a navigable menu.
Make sure you have gone through the Getting Started tutorial for the board you would like to use:
Materials
Hardware:
- Micro USB Cable
- TinyScreen+ Processor OR TinyScreen TinyShield (you will also need a TinyDuino or TinyZero processor in combination with this)
Software:
- Arduino IDE
- TinyScreen Library (You should have this already installed after going through the getting started tutorial)
- GraphicsBuffer
- TimeLib
- Menu Scroll Arduino Sketch
Step 1: Hardware Assembly
Depending on the hardware option you have chosen, you either need to put together a stack of a TinyDuino or TinyZero with the TinyScreen TinyShield to plug into a Micro USB, or you can plug just the TinyScreen+ in.
Step 2: Software Setup
In order to program the TinyScreen TinyShield or the TinyScreen+, you will need the GraphicsBuffer and TimeLib libraries (in addition to the TinyScreen library) included in the getting started tutorials linked at the beginning of this page.
To install the GraphicsBuffer Arduino library, check out our Library Installation Page.
Step 3: The Code!
Download the Menu Scroll Arduino Sketch, unzip the folder and place the sketch somewhere that makes sense for you. Double click one of the .ino files to open the program.
Once the code is open in the IDE, check that both the TinyScreen-menu-scroll.ino and menu.ino tab are both viewable at the top of the window. If you can't see both, close the IDE and make sure both files are located in the same folder before re-opening the program. The code is initalized to work with the TinyScreen+. If you choose to use the TinyScreen you will need to edit these two lines at the top of the TinyScreen-menu-scroll.ino file to comment out the first line and uncomment the second line:
TinyScreen display = TinyScreen(TinyScreenPlus); // TinyScreen+
//TinyScreen display = TinyScreen(TinyScreenDefault); // TinyScreen TinyShield
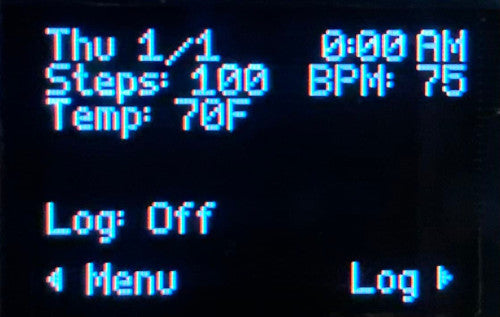
Make the correct tools selections in the Arduino IDE, and then upload the program. After a successful upload, you should be able to navigate through the menus and submenus using the four buttons on the hardware.

There are menu options to set the:
- Time & Date - You will need to set the time using military time (using hours from 1-24) in order to differentiate between AM and PM times.


- Brightness - This will change the brightness of the screen on a scale of 0-15, with 15 being 100% brightness. Brightness is initially set to 0008 which is about 50% brightness. Keeping the brightness low, as with any electronic, will help save battery life.

- Menu 2 - leads to a submenu with the options that can be filled in. This submenu has no functionality, it is a placeholder that shows you how to create a submenu with three options.
- Submenu 1 - all submenu options are placeholders that can be removed or commented out.
- Submenu 2
- Submenu 3

- Option 4 - these are also placeholders for adding more options. These can be removed or commented out in the code.
- Option 5
Power cycling, or turning the hardware off while make you lose all the data you set in the Time & Date and Brightness menu - so be sure to keep it powered if you want to keep these settings saved.
Most of the menu programming is in the menu.ino tab. In this file you can toggle the menu_debug_print variable at the top of the file to true or false for debug messages that print in the Serial Monitor as you navigate through the menus on the TinyScreen or TinyScreen+.
Right below the debug option, you can change the colors of the menu text. A list of the pre-set color options is commented in the code.
There are lots of other tips and information commented throughout the code to help you customize any menu selections your heart desires!
Contact Us
If you have any questions or feedback, feel free to contact TinyCircuits support or make a post on the TinyCircuits forum.
Show us what you make by tagging @TinyCircuits on Instagram, Twitter, or Facebook so we can feature it!
Thanks for making with us!