Tiny Bluetooth Fan Boat
Overview
Learn how to build a tiny fan boat that you can control directly from your mobile device with these simple steps:
Materials

- TinyDuino Processor
- Dual Motor TinyShield
- USB TinyShield
- Bluetooth LE (Nordic) TinyShield
- Battery
- 6mm Motors (x2) (spin opposite direction)
- Small Quadcopter rotors (x2) (opposite direction)
- Popsicle sticks (or other sturdy building material)
- Female Motor Connectors (x2)
- Male Motor Connectors (x2)
- Hollowed out bottles or tube (x2)
- Some scrap styrofoam
- Duct Tape
- Hot Glue Gun
Step One: Prep the Boards
If the two female motor connectors have not yet been soldered to the Dual Motor TinyShield, connect these female pins to the pre-soldered ports for motor 1 and motor 2.

Step two: Assemble the Boards
Stack the Dual Motor TinyShield on top of the TinyDuino Processor. Then place the USB TinyShield on top of the Dual Motor. Finally, place the Bluetooth LE TinyShield on top of the USB module. Make sure the switch on the TinyDuino is off, and connect the battery to the TinyDuino processor. Wrap the wire of the battery underneath the board stack, and allow the stack to sit on top of the battery.

Step Three: Prep the Motors
Solder the male motor connectors onto the motors. Place the rotor on the motor so that the dominant direction of the rotor (likely the pull direction) is pointing towards the motor. This will likely mean you should place the rotor upside down, but you can always change this later if we guess wrong.

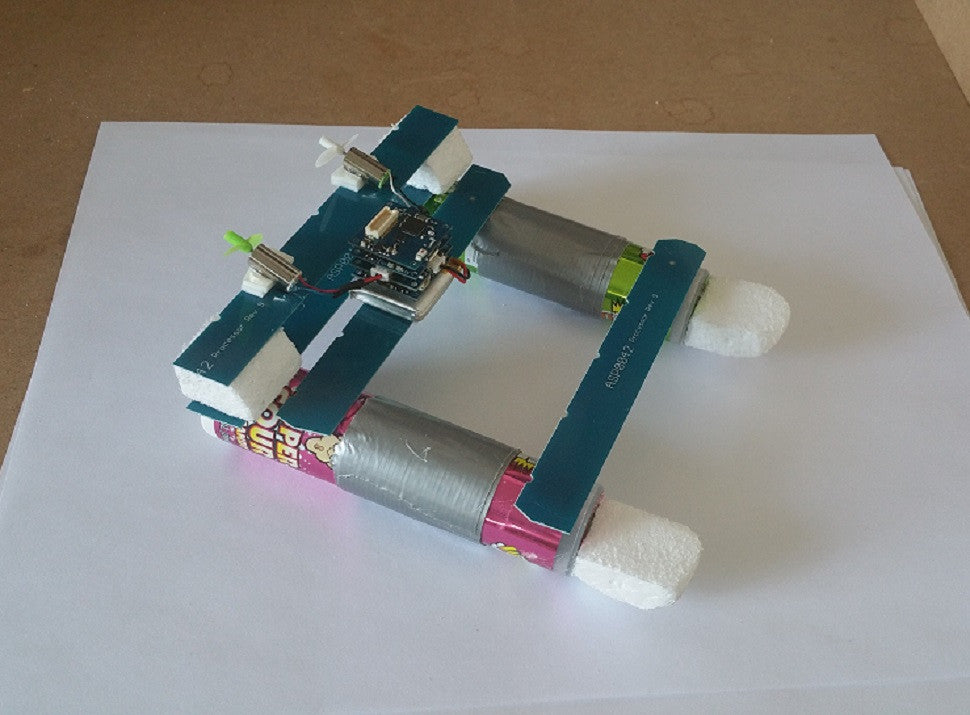
Step Four: Build the Frame
Start by making sure the two pontoons are waterproof by adding a thorough layer of duct tape to any potential openings. Measure the total length of both of the props, then place the bottles so that their inner edges are no closer than the total length of the two props. Take Popsicle sticks and glue them so the bottles are apart by the measured distance, and cut/sand any remaining Popsicle stick. Use another Popsicle stick to create a rest for the boards, and glue it to the bottles as shown.

Step Five: Build the Motor Stand
Take some of the scrap foam and sand two pieces into flat, level surfaces about a half to three-quarters of an inch thick. Glue them so they are placed over the back end of each of the pontoons on top of the Popsicle sticks as pictured.
Take another Popsicle stick and glue it to the top of these foam blocks to form a bridge.

Step Six: Attach Motors
Before gluing the motors to this bridge, you may want to take a small piece of a double sided sticky pad or other adhesive spacer, and attach to of them to the parts of the Popsicle stick where you plan to glue the motors. This will allow you to have a slight downward angle in the motor's thrust which will allow the boat to remain level, or even lift bow slightly out of the water.
Set the circuit stack on top of the lower bridge of the boat, and connect the motors to the ports, M1 and M2 on the Dual Motor TinyShield.

Step Seven: Add Nose to Pontoons
Take the remaining two pieces of scrap foam, and sand them into nose caps of appropriate size for your pontoons. Make sure the bottom of each of the caps has an upward slope to help the boat glide through the water.

Step Eight: Coding
Download the codebender plugin for your internet browser, and upload the following sketch on to your TinyDuino Processor:
Step Nine: Download/Configure App
Go to either the Google Play store or the iTunes App Store and download the application: nRF Toolbox.
Once you open the app, click on the bottom logo that is labeled, UART.
A key pad will appear, and we can edit this to be our control pad. Click on the edit tab:

Click the top, left button. This button will set your fan boat to be on a low throttle setting. You can use any icon you would like, but make sure that in the text box at the top, you type in the number "1". Click ok.
Click on the top, middle button. This button will instruct your fan boat to move forward. Again, you can use any icon you would like to set the button to, but make sure you type in the letter, "f", into the text box. Click ok.

Click on the top, right button. This button will set your fan boat to be on a low-medium throttle setting. Set the button to any icon you'd like, and type the number, "2", into the text box. Click ok.
Click on the middle, left button. This button will instruct your fan boat to rotate left. Set the button to any icon and type the letter, "l", into the box. Click ok.
Click on the middle, middle button. This button will instruct your fan boat to stop moving. Set the button to any icon and type the letter, "h", into the box. Click ok.
Click on the middle, right button. This button will instruct your fan boat to rotate right. Set the button to any icon and type the letter, "r", into the box. Click ok.
Click the bottom, left button. This button will set your fan boat to be on a medium-high throttle setting. Set the button to any icon and type the number, "3", into the box. Click ok.
Click on the bottom, middle button. This button will instruct your fan boat to move back. Set the button to any icon and type the letter, "b", into the box. Click ok.
Click on the bottom, right button. This button will set your fan boat to be on a high throttle setting. Set the button to any icon and type the number, "4", into the box. Click ok.
Testing

Turn on the app. Select the UART button, and click Connect at the bottom of the screen. Turn on the fan boat. A device called, UART should appear on the available devices list. Click this. UART is the fan boat.
Test the controls and make sure they are correct. If the controls appear to be backwards, unplug the motors, flip around the board stack, and plug the motors into their opposite sockets. You also may need to reverse/switch the props until you get the desired outcome on the controls. You can also go into the software and make an edit and correct your problems without physical alterations on the boat.
If your electronic components get water on them, consider adding duct tape to areas on the frame of the boat or around the electronics to prevent water damage.