Audio Amplifier Wireling Tutorial
The Audio Amplifier Wireling makes it easy to output short 8-bit audio samples. This tutorial goes through the process of setting up the audio amplifier hardware, converting audio samples to raw pulse-code-modulated data (PCM), and uploading an Arduino audio player sketch.
Materials
Hardware:
- Micro USB Cable
- WirelingZero Processor Board (or any processor board with a Wireling Adapter TinyShield, except TinyDuino)
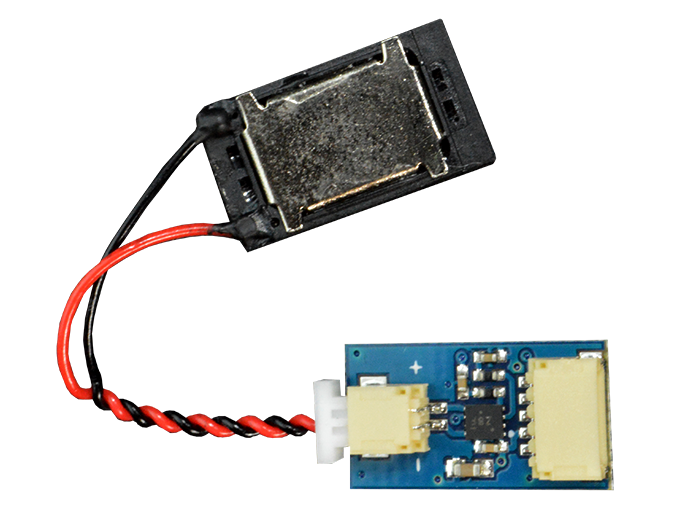
- Audio Amplifier Wireling
- 40mAh Battery
- 5-pin Wireling Cable
- 16x9MM Speaker
Software:
- Arduino IDE
- Audio Amplifier Wireling Example Sketch
- SAMD_TimerInterrupt Arduino Library
- Audacity
- bin2header script
Background:
- The total audio stored can only be a couple seconds long (it may need to be even shorter for high sample rates)
- All audio has to be converted to 8-bit, which may be less discernable but good enough
- Pin A0 is the only pin connected to a 10-bit digital-to-analog converter (DAC) on the SAMD21 and is only available on Wireling port 0
Step 1: Assembly (Hardware)
- Plug the 5-pin Wireling Cable into port 0 on the WirelingZero processor board (port numbers are located on the bottom of the board)

- Connect the other end of the 5-pin cable to the Audio Amplifier Wireling

- Insert the 16x9MM speaker cable into the Audio Amplifier Wireling

- Going back to the WirelingZero processor board, plug the 40mAh battery into the WirelingZero

- Plug the MicroUSB cable into the WirelingZero processor board and your computer
- Make sure to switch the WirelingZero power switch to ON ("ON" and "OFF" are marked on the bottom of the board)
Step 2: Software (Setup)
Multiple pieces of software are used to get the audio playing out of the speaker, let's go step-by-step.
Sketch Downloading
- Download the AudioAmplifierWireling.zip from the software section under "Audio Amplifier Wireling Example Sketch"
- Extract AudioAmplifierWireling.zip
- If you are familiar with the software and hardware, go ahead and upload AudioAmplifierWireling.ino and plug in the Audio Amplifier Wireling and speaker on port 0 to test right away. After uploading the example sketch you should hear the word "hi" play repeatedly
- If you want to use your own audio, and keep things organized, delete the following files from the extracted AudioAmplifierWireling.zip, then follow the rest of the tutorial
- hi.mp3
- sample.raw
- sample.raw.h
Audio Formatting
- Get a short audio sample on your computer in whatever way works for you
- Transfer a recording from your phone
- Record the sample using your computer directly
- Download a sample from online
- .mp3 is likely the best format to use in this case but the sound editing program we will use can import most audio types
- It is probably best to place the audio file inside the Arduino project folder downloaded and extracted earlier
- Install Audacity from the software links above
- Open Audacity and navigate to File > Import > Audio

- Select the audio sample from the file manager pop-up, in this case, "hi.mp3", click "Open"

- If the imported audio is stereo/has two tracks then it needs converted to mono. Click the black dropdown arrow (where the orange arrow is pointing) and then click 'Split Stereo To Mono'

- The audio is now split into separate tracks, delete a track by clicking the 'X' to the left (where the orange arrow is pointing)

- There is a number under "Project Rate (Hz)" on the borrom-left of the Audacity window (where the orange arrow is pointing), write this number down for later; in this case it is "48000"

- At this point the track could be modified/edited but we'll just export it right away: navigate to File > Export > Export Audio...

- There are a couple steps before clicking "Save"
- Make sure "Save in" is set to the Arduino project folder downloaded earlier
- Set "File name" to "sample.raw" (this is important)
- Make sure "Save as type" is "Other uncompressed files"
- Set "Header" to "RAW (header-less)"
- Set "Encoding" to "Unsigned 8-bit PCM"
- Click "Save"
- Click "Yes" if it asks to overwrite existing files

- In the "Edit Metadata Tags" window click "Clear" and then "OK"

- We are done with Audacity, exit out of it
Audio Conversion
- Navigate to the Arduino project folder downloaded earlier using a file explorer
- Left click/select all the text in the file path bar and type 'cmd'

- After typing 'cmd' press Enter or Return, a command prompt will pop up. Type 'bin2header.exe sample.raw' and press Enter or Return.

- The audio has been converted to a file called 'sample.raw.h', this header file is used in the Arduino sketch to to pull audio samples from. Exit out of the command prompt.
Uploading
If this is your first time using the Arduino IDE, Wirelings, or the WirelingZero, visit the WirelingZero Setup Tutorial (there are also setup tutorials for other processor boards as well as one for the Adapter Wireling TinyShield).
- To complete the IDE setup, open the IDE, navigate to Sketch > Include Library > Manage Libraries

- In Library Manager search for "SAMD_TimerInterrupt" using the top-left textbox and then click "Install". The below image shows what it looks like after searching for and installing the library.

- Before uploading the program and audio header samples, close out of Library Manager and navigate to Tools > Board, select 'WirelingZero' (or whichever processor board you may be using)

- In the IDE, navigate to File > Open and the use File Explorer to find the Arduino project downloaded earlier, open 'AudioAmplifierWireling.ino'
- Plug the WirelingZero (or any other processor board) into your computer using the MicroUSB cord. Make sure the power switch on the board is switched to ON.
- In the IDE, navigate to Tools > Port and select the relavent port (the correct port is usually marked with 'TinyScreen+' no matter the processor board). See the below image

- At his point the board is ready for uploading the sketch but a little more configuration is needed
Step 3: The Code!
As long as the audio sample was converted to a .raw file under the name "sample.raw" and that was converted to "sample.raw.h", then only one line needs changed in the AudioAmplifierWireling.ino sketch file.
- Change the AUDIO_SAMPLE_RATE_HZ number on line 8 from "48000" (as written down earlier) to the number your audio imported into Audacity with. See the below image.

- Everything is ready to upload! Go ahead and press the top-left upload arrow button
Troubleshooting
- The audio is quiet
- Make sure the 'volume' variable in the AudioAmplifierSketch.ino is set to '1.0f'
- Look at the imported .mp3/etc. audio file in Audacity and see if its magnitude ever reaches the max or min of 1.0 or -1.0 respectively. There are ways to boost the sample's gain in Audacity, give it a quick Google search
- If all else fails, press the front of the speaker against a rigid but sort of flexible surface, this will vibrate the surface and make it act as a larger speaker/diaphragm
- The audio has background noise or static
- This could be a result of converting high quality audio (16 or 32-bit) to 8-bit
- Other factors could occur where a low-pass filter in Audacity may help, search Google
- The audio sample may be clipping. When in Audacity check if the waveform ever exceeds the 1.0 or -1.0 limits, if so, the waveform needs editing
- Oversized sketch error or random crashes
- If the sketch is oversized and the compiler tells you, then the audio sample contains too much data and its length needs to be made shorter
- If the compiler does not tell you or the audio data was just under the memory limit, then you may encounter random crashes as the program runs. Watch the IDE terminal as the sketch is uploaded, check to see how much memory the sketch/audio is taking up
Contact Us
If you have any questions or feedback, feel free to contact TinyCircuits support or make a post on the TinyCircuits forum.
Show us what you make by tagging @TinyCircuits on Instagram, Twitter, or Facebook so we can feature it!
Thanks for making with us!